The Battle of Antietam – September 1862, a Grand Tactical review. – (maps Civil War Trust clips)
Gen. McClellan attacks Gen. Lee’s lines, at Dawn the I Corps lead by Fighting Joe Hooker pushes the Rebels in the Cornfield, the East and West Woods. Late in the morning the II Corps lead by Gen. Sumner arrive and deploy just out of the East Woods. The Brigades deploy as they arrive after crossing at the north bridge, forming Brigade Lines. Sedgwick’s Division is the first in the march column, Sedgwick’s Brigades (Gorman, Dana, Howard) form up with only 40 paces/25 yards between each Brigade line. Gen. Sumner advances the Division into the East Wood and through into the open fields. Gen. McClellan was expecting Gen. Hooker to coordinate the actions of the II Corps, but arriving onto the field Gen. Sumner could not locate Hooker as he had just left the battlefield due to his wounds. A history “What if”, had Hooker been present to give Sumner the proper attack vector. Sumner missread the battlefield – he had believed that the Union had secured the northern battlefield, he marched out with Sedgwick’s Division to enter the West Woods then to wheel the Division South and roll up the Rebel line. As Sedgwick’s Brigades advanced they spread out to 75 paces/45 yards between the lines, but as they entered the West Woods, they closed up again to only 40 paces/25 yards apart. Packed into the West Woods, there was no room to wheel or redeploy the units, once under fire, attempting passage of lines, attacked in front and on flanks it lead to disaster. (the formation was similar to Upton’s attack in May, 1864).

The second Division of the II Corps had arrived, deploying into Brigade lines. Gen. French could not find Gen. Sumner, Sedgwick’s men were hidden in the West Wood, and with French misreading the fighting around Dunker Church as his Corps, he set his attack vector angled to the south.
French’s three Brigades (Weber, Morris, Kimball) hit the Rebel line along the Sunken road, going into action piecemeal, as one was replused the next brigade advanced with passage of lines to attack and with all of his brigades stalled against the rebel lines, it was Sumner’s last Division lead by Gen. Richardson that arrived.
Gen. Richardson advanced to support French’s Division left flank, his Brigades in line contacting along the lane that is remembered today as “Bloody Lane”. Meagher’s Irish Brigade hit first and needed support by Caldwell’s Brigade, with Brooke’s Brigade moving thru (passage of lines) to finally break the Rebels.
Of note, the artillery is assigned to each Division at the time of the battle, Sedgwick’s guns unlimbered on the southern flank of his advance, they formed the hinge between him and French’s Division moving to the south. The guns of French and Richardson did not have ground to unlimber on as the Rebel lines were just behind a crest line, this ridge gave cover as the Union Brigades used passage of lines as each made their attack.

In game terms, all Brigades advanced and fought in Brigade front/Battleline for maximum firepower/shock. Multiple examples of passage of line are seen, with many not successful under fire. Division command control is seen as the Division leaders get their units in close support to manage their attack, with Gen. Sumner not near he provides no assistance to French and Richardson. Sedgwick’s guns provided good support, as the game system should support the proper use of the guns, looking at the battle one does not find the Division guns being used outside the zone of their Division Leader. One great insight into this tactical view is from Tidball, one of the battery commanders within the Horse Artillery Reserve. He would write after the battle, what if the 24 guns within the Horse Artillery Reserve had been ordered forward to deploy onto the ground near Dunker Church during that key window when the battle stood in the balance? Gen. Henry Hunt had only been Chief of Artillery for a short while, he had served The Army of Potomac very well, the guns created a killing ground here, but Tidball’s thoughts would be put into action by Hunt at Gettysburg.
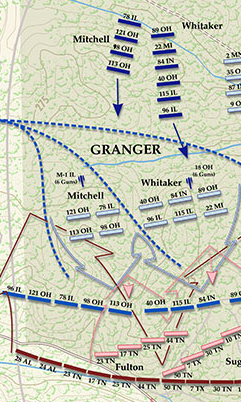
Interesting comparison, the Battle of Chickamauga in September 1863, one year later.
Tactics have changed, note the Union Brigade Formations – Double Line use in 1863 –