Were back and here for any questions or issues you might have! Thank You, John Simmons
Leave a reply

Greetings, The blog has had a long pause due to family issues and the pending release of the .PDF version of the Firebell rules. With the recent publication of the .PDF available from Wargamevault.com, I will be posting a large collection of gaming information.

General Johnston inspection of the Gun mounted on Rail during the Spring of 1862. 15mm Custom model by Dale Wood.
Two scenarios will be added very soon – the Battle of Glendale (Frayer’s Farm) and Bull Run I.
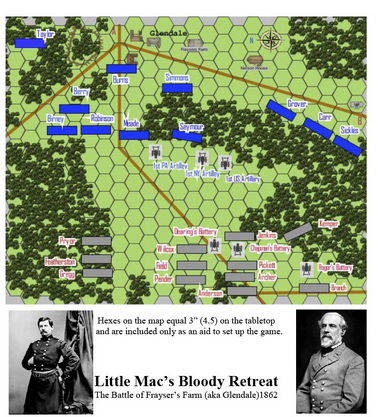 Cover page for the Frayser’s Farm, or Glendale Battle during the Seven Days action.

Sample of one of the Roster Sheets used by the Union Army to track loses.
I have a number of issues that I believed were of value in improving the quality of the game that were not included. As I work thru these emails I will be posting for gamers to review and use as needed. Thanks, John
Reviewing the battles of The Army of Potomac and the trend for Brigade Double Line to be used more often. The use of Double Line provided a quicker response time to movement, better command and control in the heavy woods found on many of the battlefields. It was used as a defensive formation when facing the unknown or when in close support. Within the Firebell rules this is how the system models Double Line.
Example – Battle of Chancellorsville on the first day, May 1st. Union/Sykes Division has all three Brigades in Battleline for an offensive probe (Ayers/Burbank/O’Rorke), Union/Hancock Division is in rear support, he has his two Brigades (Caldwell/Zook) in Double Line within the woods as a strong defensive second line. On the southern flank, Willams Division also is holding a defensive position, he has the Brigades (Ruger/Knipe) in Double Line within the woods.
 [Clip of Maps from the Civil War Trust]
A review of Gen. Lee’s advancing Rebel’s, the front Brigades are in Battleline for max. offensive impact, a Brigade lead by Kershaw is in support positioned in Double Line to allow for a quick response/movement. McLaws is leading his Division onto the field, he is moving to the northern flank, he forms up with his central Brigade in Battleline, with a supporting Brigade in Double line on each flank, also in woods (the use of Double Line to protect against a possible flank attack). ======================================================================
Now we look at Gettysburg on the Morning of July 3rd Dawn. Gen. Ewell/Corps has moved additional Brigades into the renewed fighting at Culp’s Hill, reorganized now with Johnson’s Division. Within the Woods below the steep Culp’s Hill, the Rebel Brigades (Jones/Williams/O’Neal/Walker) are attacking in Double Line in the difficult terrain.
 On the lesser hill, two rebel Brigades (Steuart/Daniel) attacked in Battleline, with Smith’s Brigade on the Division flank in Double line as a strong anchor. The action around Culp’s Hill is one of the few places during the three day’s of fighting around Gettysburg that the formation of Double Line can be seen. With the gentle slopes and open fields, Battleline was the most common formation used.
The Battle of Antietam – September 1862, a Grand Tactical review. – (maps Civil War Trust clips)
Gen. McClellan attacks Gen. Lee’s lines, at Dawn the I Corps lead by Fighting Joe Hooker pushes the Rebels in the Cornfield, the East and West Woods. Late in the morning the II Corps lead by Gen. Sumner arrive and deploy just out of the East Woods. The Brigades deploy as they arrive after crossing at the north bridge, forming Brigade Lines. Sedgwick’s Division is the first in the march column, Sedgwick’s Brigades (Gorman, Dana, Howard) form up with only 40 paces/25 yards between each Brigade line. Gen. Sumner advances the Division into the East Wood and through into the open fields. Gen. McClellan was expecting Gen. Hooker to coordinate the actions of the II Corps, but arriving onto the field Gen. Sumner could not locate Hooker as he had just left the battlefield due to his wounds. A history “What if”, had Hooker been present to give Sumner the proper attack vector. Sumner missread the battlefield – he had believed that the Union had secured the northern battlefield, he marched out with Sedgwick’s Division to enter the West Woods then to wheel the Division South and roll up the Rebel line. As Sedgwick’s Brigades advanced they spread out to 75 paces/45 yards between the lines, but as they entered the West Woods, they closed up again to only 40 paces/25 yards apart. Packed into the West Woods, there was no room to wheel or redeploy the units, once under fire, attempting passage of lines, attacked in front and on flanks it lead to disaster. (the formation was similar to Upton’s attack in May, 1864).

The second Division of the II Corps had arrived, deploying into Brigade lines. Gen. French could not find Gen. Sumner, Sedgwick’s men were hidden in the West Wood, and with French misreading the fighting around Dunker Church as his Corps, he set his attack vector angled to the south.
French’s three Brigades (Weber, Morris, Kimball) hit the Rebel line along the Sunken road, going into action piecemeal, as one was replused the next brigade advanced with passage of lines to attack and with all of his brigades stalled against the rebel lines, it was Sumner’s last Division lead by Gen. Richardson that arrived.
Gen. Richardson advanced to support French’s Division left flank, his Brigades in line contacting along the lane that is remembered today as “Bloody Lane”. Meagher’s Irish Brigade hit first and needed support by Caldwell’s Brigade, with Brooke’s Brigade moving thru (passage of lines) to finally break the Rebels.
Of note, the artillery is assigned to each Division at the time of the battle, Sedgwick’s guns unlimbered on the southern flank of his advance, they formed the hinge between him and French’s Division moving to the south. The guns of French and Richardson did not have ground to unlimber on as the Rebel lines were just behind a crest line, this ridge gave cover as the Union Brigades used passage of lines as each made their attack.

In game terms, all Brigades advanced and fought in Brigade front/Battleline for maximum firepower/shock. Multiple examples of passage of line are seen, with many not successful under fire. Division command control is seen as the Division leaders get their units in close support to manage their attack, with Gen. Sumner not near he provides no assistance to French and Richardson. Sedgwick’s guns provided good support, as the game system should support the proper use of the guns, looking at the battle one does not find the Division guns being used outside the zone of their Division Leader. One great insight into this tactical view is from Tidball, one of the battery commanders within the Horse Artillery Reserve. He would write after the battle, what if the 24 guns within the Horse Artillery Reserve had been ordered forward to deploy onto the ground near Dunker Church during that key window when the battle stood in the balance? Gen. Henry Hunt had only been Chief of Artillery for a short while, he had served The Army of Potomac very well, the guns created a killing ground here, but Tidball’s thoughts would be put into action by Hunt at Gettysburg.
Interesting comparison, the Battle of Chickamauga in September 1863, one year later.
Tactics have changed, note the Union Brigade Formations – Double Line use in 1863 –

The following document was created as a handout for new gamers to read as an introduction to A Firebell in the Night rules. With the player assigned to Divisional command, the player is put in the position of having a briefing by his new Corps Commander. The key game terms are in Bold text to provide a quick start up for understanding the rules.
Review by Paul D. Stevenson in issue #363, Paul is well known for his Civil War Scenarios – 1/2 of review used due to copyright. –
“The rules come in an A4 softback cover with 54 glossy pages, some in color. Of this total, ten pages feature the Battle of Seven Pines and twenty pages are given over to rating every commander (over 1,000) in the Civil War.”
“There is no index, but the rules are nicely laid out and easy to follow. The illustrations are from Battles and Leaders…” (There is an index/ the Table of Contents is just before page 1 of text)
“Also included is a glossy card playsheet and five A4 sheets enabling the gamer to cut out 50 ‘crisis cards’ which are drawn during play to cover random events that might influence the battle. Some preparation is needed to play and records are kept of a unit’s supply status, ‘diminishing’ brigade strength and fluctuating battle efficiency – not to onerous. ”
“I do like the way skirmishers have been accounted for in assessing casualties – they are represented in the abstract, but when battle lines get to close quarter, their presence as a screen is removed with an inevitable increase in casualties. Command functions have a part to play and the commanders have characteristics and a radius of influence. They can be hit, too – though (inferior) replacements can be made.”
“If the title seems a little obscure, the rules seem pretty much spot on in presenting a good simulation of large scale ACW conflict and is represent an alternative to the popular Fire and Fury set, also aimed at brigade level.”
Union Leadership at Antietam, the bloodest day, a firestorm if there was one.
This new rule-set allows you to reconstruct the fighting at the time of the Civil War. The rule-set is specifically for 15 mm figures, with all bases an inch (2.5 cm) wide. This represents in reality about 300 infantry and dismounted cavalry. An artillery unit, always with an edge of an inch, is equivalent to a battery of four to six guns. In fact, the “strategic” brigade forms the base unit, consisting of about four bases on the table so one base is equivalent to one regiment. One inch on the game table is 100 yards (about 90 meters) and a turn represents twenty minutes. Note that all distances are given in the rules in two formats. The first corresponds to the bases with a frontage “standard” (one inch or so): the second in a frontage of one and a half inches (about 4 cm), suitable for example for 28 mm figures.
Practically, a unit is rated by its level. Four morale grades are possible: militia, green, veterans and cracks. Each player also has a sheet with the order of battle of his army, and for each brigade, boxes based on strengths (one box per 100 men) and efficiency points accumulated. These points are inefficiency, stragglers, fatigue, or disorder. In fact, they have accumulated Es of combat or while traveling in difficult terrain. The E factors affect the morale and combat. Fortunately, they are possible to reduce during the game: at the end of a round, if a unit has not moved, fought or been lost it recovers 1d6 efficiency. Proper management of these issues is one of the keys to victory. It is indeed necessary to take time to know when to reorganize your command.
During a turn there are successive phases of “buy and supply,” initiative, control and movement of troops’ gunfire, morale checks due to the shooting, fighting infantry and cavalry, morale checks due to the fighting and, finally, the possibility of recovering efficiency points. Fighting is resolved with 1d20 for each “natural” result of 1 to 5, the unit loses a level of ammunition. Four levels are possible and the lowest two levels affect combat. To go back to the maximum level the unit must be in phase supply near his truck divisional supply and pass a die roll 1 to 10 of 1d20. Besides influencing the level of ammunition, during combat if a die roll is odd a crisis card is drawn. Five sheets of 10 cards are provided for a total of fifty cards. For example, a card may be drawn that shows the General of the brigade was drunk and so he and his men must charge any target in range. Another card may tell you that your Brigadier was killed at the head of his brigade. There may also be a box of exploding artillery (1D16 efficiency points for the battery). Etc.
For fighting, either shooting or melee, the principle is to take the strengths, usually by efficiency minus points, then multiply by various tactical factors (x 2 for rifled artillery short-range x 0.5 extreme range, etc..) and / or add or subtract other tactical factors (30 if the target is column -10 if the shooter has little ammunition, etc.). The end result is usually a fairly high number. For each 20 points, the target loses a point of strength. The remainder tested with 1d20. Thus, for a final score of 72, the target loses three points of strength and must get 12 or less on 1d20 to make a fourth. It’s simple, but it still requires some calculations.
Control of troops is simply done through distance of command that depend upon the skill of the Generals. Moreover, you will find a list of more than a thousand Generals, and, for each, their command radius and bonus it brings morale. This morale is tested also with 1d20. Note a very original feature: for an assault, the morale basis for the militia is 5, it increases to 10 for the “green” descends curiously 5 for veterans and goes back to 15 for cracks. In fact, the veterans saw the fire and are well aware of quite “lethal” nature of a charge. In short, it is paradoxically easier to launch an assault with novices than with hardened veterans (by contrast, the cracks are really able to mount an assault “on demand”). It is well thought out.
Finally, note the presence of a historical scenario the Battle of Seven Pines (31 May 1862). A summary sheet duplex and full plastic everything. In general, the rule is interesting, medium complexity and clearly oriented “strategic level”.
As we look over Civil War books with good maps – we find the Formation of “Double Line” was very common during the last half of the war. The formation was formed by having half of the Brigade Regiments in line with the remaining Brigade Regiments deployed in the rear but with deployment distance – not stacked close up. In the Firebell rules, we should have a 1″ to 2″ open space between the Brigade lines (100 -200 yards). This space was important to give the rear regiments the space required to deploy as the Brigadier ordered, also if the front of the Brigade entered into a fire fight this space limited damage to the rear support regiments.
In 1861, the Brigade officers went to war with the tactics learned from the Mexican-American War, the Brigade forming all of its regiments in line for maximum fire power.
The tactics and terrain defined it’s use – (as a Brigadier leading 2,400 men the Brigade in line would be 1/2 mile long, could you see the end of your own formation or beyond and the threat to your flanks?)
Example, Antietam, the Union Iron Brigade, Gen. Gibbon in command, advances south to the battlefield during early dawn. The Brigade in March Column moves off the road, forming regimental columns of divisions (2 companies wide) with two regiments in front, with two trailing behind, two long lines made up a number of company lines. This Brigade formation of Double Line putting the unit into a battlefield formation, but not fully deployed into line yet.
AS THEY APPROACHED THE NORTH WOODS WHICH WAS IN THE FIRE ZONE OF MEADE’S BRIGADE, THE BRIGADE DOUBLE LINE DEPLOYED, TWO REGIMENTS IN THE FRONT – COLUMNS MOVING INTO LINE, THE TRAILING TWO REGIMENTS MOVING INTO LINE BEHIND THE FRONT TWO REGIMENTS. THEY MOVED AT COMMON TIME INTO THE WOODS, MOVING THROUGH THE PA RESERVES OF MEADE (passage of lines) INTO THE OPEN FIELDS SOUTH OF THE NORTH WOODS. NOW AT THE FRONT – TWO COMPANY’S WERE SENT FORWARD AS A SKIRMISH SCREEN, THE REGIMENTS WENT TO GROUND/HALTED, THE SECOND LINE ABOUT 100 YARDS BEHIND THE FRONT LINE. THE SKIRMISH LINE AT THE FENCE FOR THE CORN FIELD, ABOUT 200-300 YARDS IN FRONT. THE BRIGADIER HAS HELD HIS REGIMENTS IN DOUBLE LINE DUE TO THE TERRAIN (visibility) AND FOR IMPROVED MOVEMENT.
WHEN THE IRON BRIGADE ADVANCED ON THE ATTACK-SKIRMISHERS FELL BACK INTO LINE, THE BACK TWO REAR REGIMENTS WHEELED TO THE RIGHT TO BRING THEM ON TO THE RIGHT FLANK OF THE FRONT TWO REGIMENTS, NOW IN FULL BRIGADE FIRING LINE.
THE BRIGADE ENTERED THE CORN FIELD AND HISTORY.
Howard’s Brigade is sent forward, advancing south of the crossroads, moving to flank the Rebel line on Henry House Hill, working to stop the rebel advance and turn the battle. As Howard moved up the western slope, he left two regiments in line as support and advanced two regiments in line up Chinn Ridge to the crest – his Brigade formed “Double Line”.
This formation was not stacked with the ranks closed up, but with intervals between the front and rear lines to allow the support regiments to deploy (react) as needed. Well, we know this turned out bad, unless your underwear is grey. (Link for battlefield map)
Why would Howard do this? He was not certain of the situation, his flanks appeared to be in the air (no support). The combination of the crest line and woods limited Howard’s battlefield awareness. Howard’s attack was a cautious advance, giving him the flexible choice. Once he could see the enemy and know their position, the Brigade would form a four regiment firing line to launch the attack. In history, he would not have the time…
Hope these battle examples help in understanding the battlefield.
Gen. Hooker had 20 Infantry Divisions, 20 Division commanders at Chancellorsville.
In the III Corps with Sickles is Berry, (present in our Seven Pines game) he is in the woods and is in the rear but close to the action where a Division Gen. should be. Barry is with one Brigade, has to cross a road to get to the rear of his next brigade, he is told by his staff to not expose himself. He runs over and makes it, the other brigade is in command, things are good, he runs back at which time a rebel SHARPSHOOTER HITS HIM IN THE ROAD, HE DIES.
Gen. Whipple in the III Corps with Sickles, late in battle, the men are digging in on the new line north of the crossroads, light skirmish fire, snipers are bothering the men, the Gen. is in the act of sending an order to get Berdan’s men to assist when a SNIPER in a tree hits him in the chest, he dies OF RIFLE FIRE.
Gen. Devens with the XI Corps with Howard, his Division is hit first by Jackson’s men, hot – chaos – bad. Devens is up close for command and control in the heavy woods, he moves up to rally one of his brigades that is breaking, is HIT BY SMALL ARMS IN THE FOOT WITH THE FRONT LINES, wounded out of action.
Interesting info huh? Note, remember this is not counting the Brigade Generals/Colonels on the firing line – they die. By giving these examples in major battles known by many, it helps to see the result compared to Firebell.
